블로그 댓글 기능을 직접 구현해보자 (with Github Login)
Jan 7, 2024
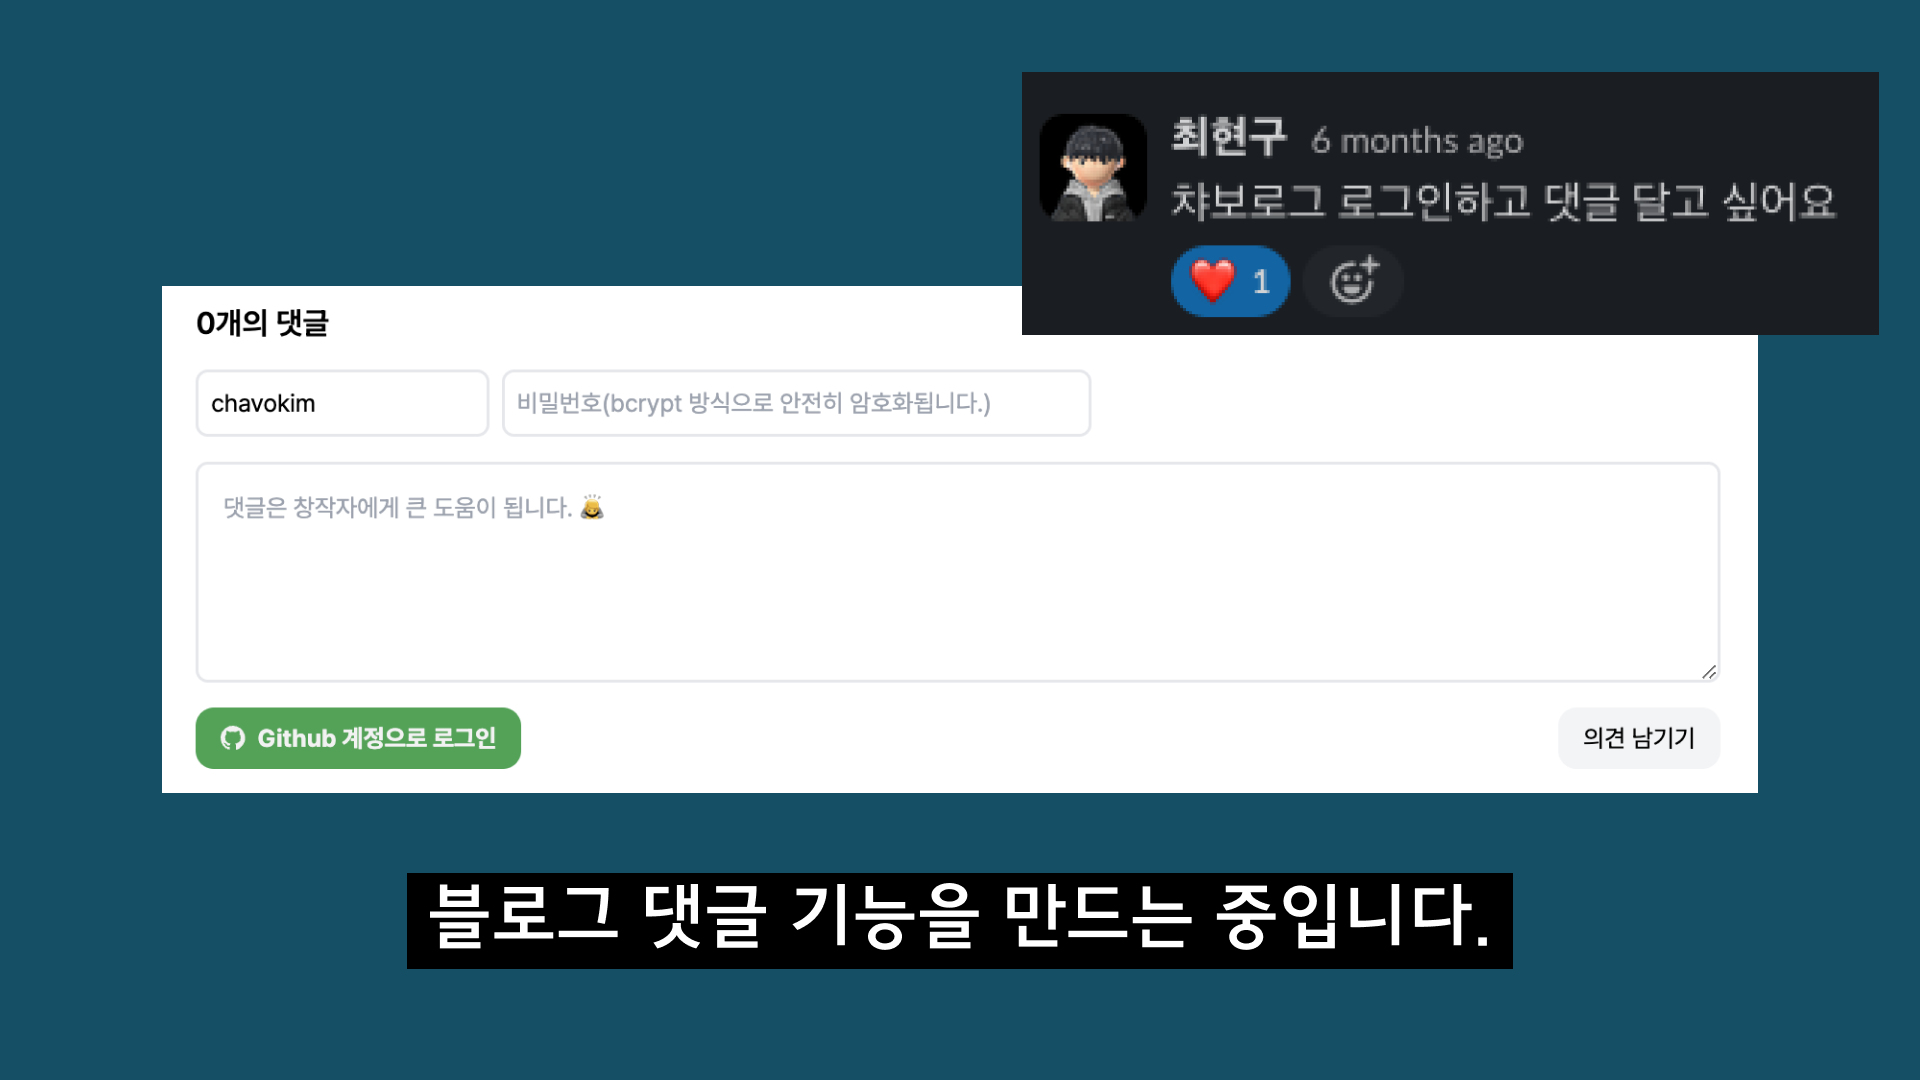
Table Of Content
풀스택 엔지니어라면 본인의 블로그는 직접 빌드해야지...라는 오만한 생각을 했을 때가 있습니다.

그 결정 덕분에 평소 쓰고 싶었던 NextJS과 tailwindCSS를 사용해서 현재의 블로그를 빌드하게 되었고,
얼마 전 NextJS의 메이저 버전 업데이트와 더불어 App Router로 마이그레이션 또한 끝내게 되었습니다.
마이그레이션 당시 제가 좋아하는 한 개발자분이 깃헙 로그인으로 댓글을 달 수 있다면 편할 것 같다는 말씀을 해주셨고,
그 말씀을 듣고 블로그에 해당 기능을 추가하게 되었습니다. ☺️
아래 글에서는 댓글 기능을 추가했던 과정을 공유하고자 합니다.

RDD(Request Driven Development)
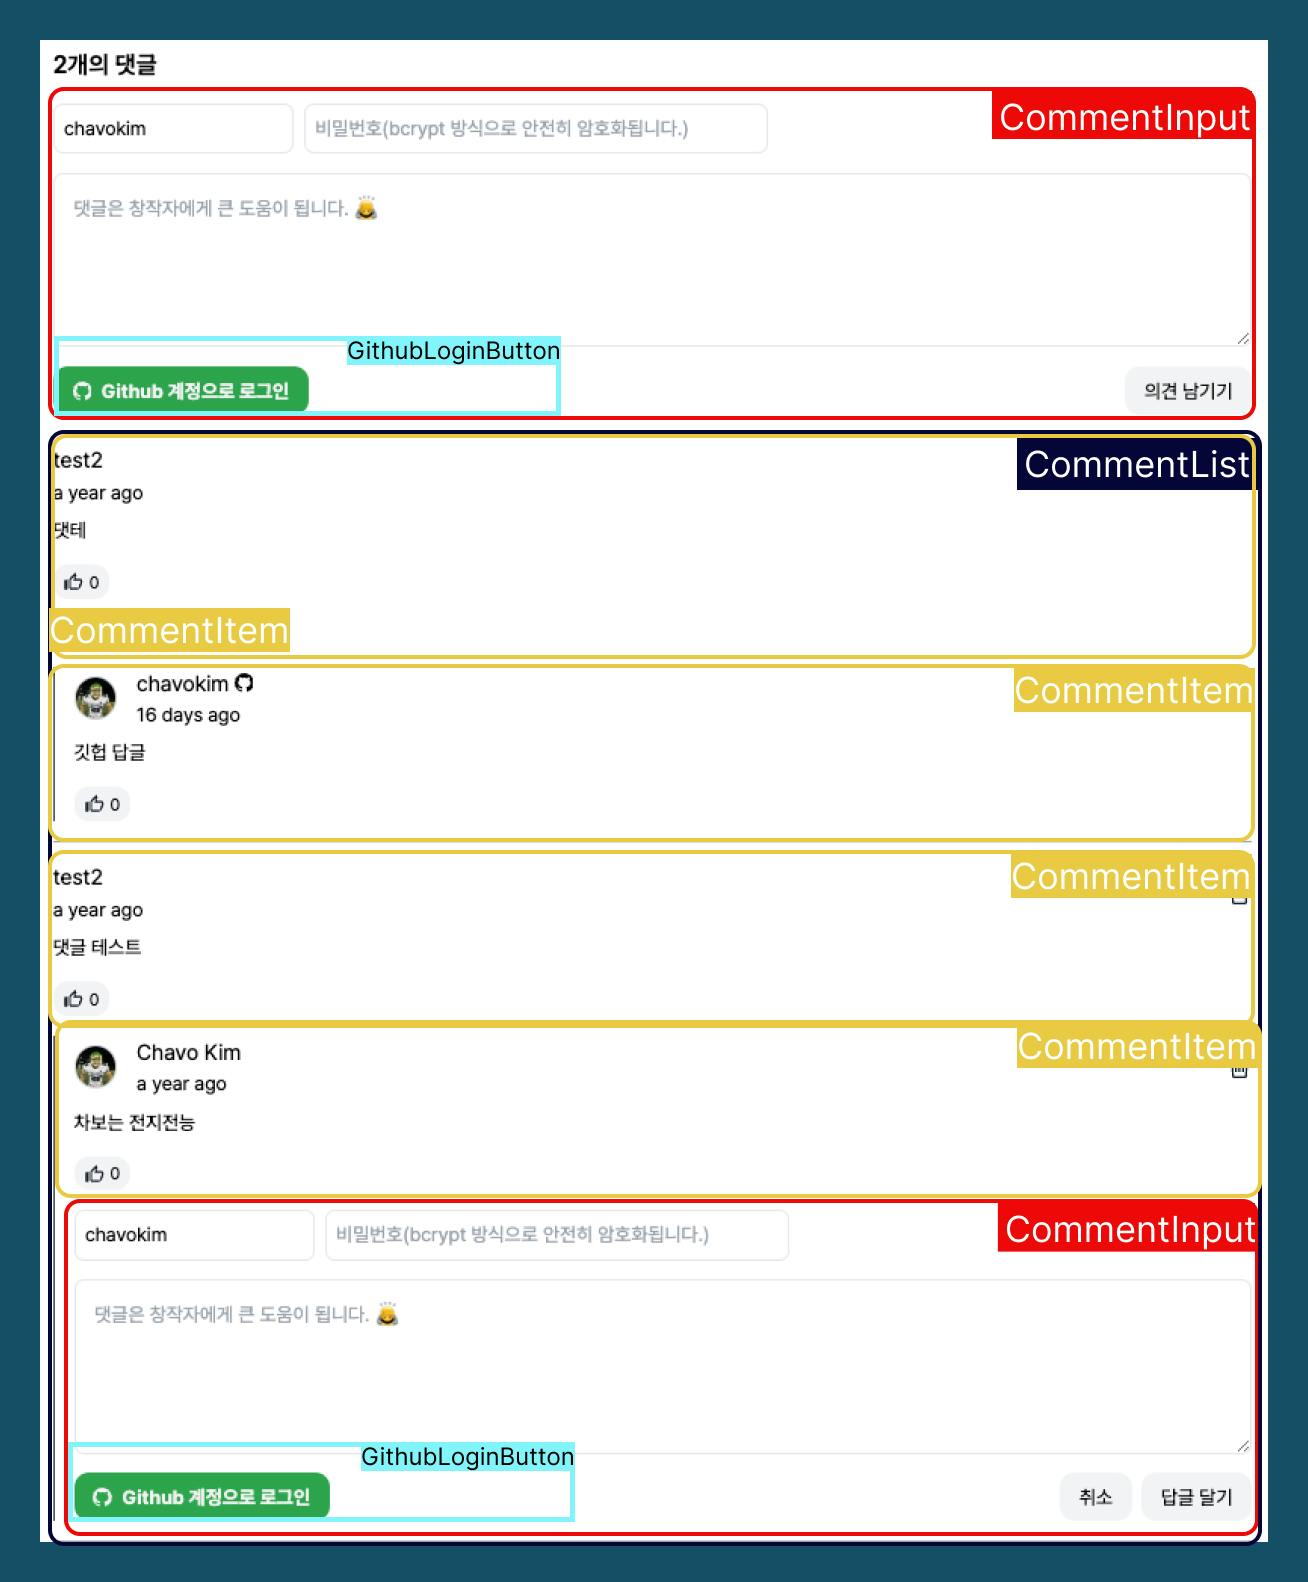
댓글 기능을 컴포넌트 단위로 나누면 다음과 같이 나눌 수 있습니다.
CommentInput: 댓글을 입력하는 컴포넌트CommentList: 댓글 목록을 보여주는 컴포넌트CommentItem: 댓글 하나를 보여주는 컴포넌트GithubLoginButton: Github 로그인을 위한 버튼 컴포넌트
컴포넌트의 목적은 재사용성을 높이는 것입니다.
위 컴포넌트는 댓글의 하위 단위인 답글을 보여주는데에도 사용될 수 있습니다.
CommentItem 컴포넌트는 CommentList,CommentInput 컴포넌트를 자식으로 사용하여 답글을
표시할 수 있습니다.
이를 트리 구조로 나타내면 다음과 같습니다.
CommentInput
└── GithubLoginButton
CommentList
└── CommentItem
    ├── CommentList (답글)
    └── CommentInput (답글)
        └── GithubLoginButton
└── CommentItem
    ├── CommentList (답글)
    └── CommentInput (답글)
        └── GithubLoginButton
...(more)
Comment 기능을 구현하기 위해 데이터 모델을 설계해야 합니다. 댓글은 다음과 같은 정보를 가지고 있어야 합니다.
- 댓글 ID (Primary Key)
- 댓글 내용
- 댓글 작성자 이름
- 댓글 비밀번호
- 답글들
이를 typescript로 표현하면 다음과 같습니다.
interface Comment {
    id: number;
    content: string;
    name: string;
    password: string;
    replies: Reply[];
}
답글 또한 댓글과 동일한 정보를 가지고 있어야 합니다. 답글은 댓글의 ID를 참조해야 하기 때문에, 댓글의 ID를 추가로 가지고 있어야 합니다.
interface Reply extends Omit<Comment, "replies"> {
    parentId: number;
}
Omit은typescript에서 제공하는 유틸리티 타입입니다.Omit을 사용하면 특정 타입에서 원하는 속성을 제거할 수 있습니다. 위의 코드에서는Comment타입에서replies속성을 제거한 타입을 정의하고 있습니다.
댓글 기능에 필요한 API 명세는 다음과 같습니다.
- 댓글 목록 조회
- 댓글 작성
댓글 수정- 댓글 삭제
- Github 로그인
댓글 수정은 구현하지 않았습니다. 익명으로 댓글을 작성할 수 있기 때문에, 댓글을 수정하기 위해 사용자 확인을 하는 과정이 필요합니다. 이를 구현하는 복잡도보다 댓글을 삭제하고 새로 작성하는 것으로 대체할 수 있어 댓글 수정은 구현하지 않았습니다.
Github 로그인 구현에 대해선 아래에서 따로 자세히 설명하겠습니다.
Github 로그인을 구현하기 위해선 다음과 같은 과정이 필요합니다. 자세한 내용은 Github OAuth를 참고하시면 됩니다.
Settings > Developer Setting에서 Github OAuth App을 생성합니다. (링크)
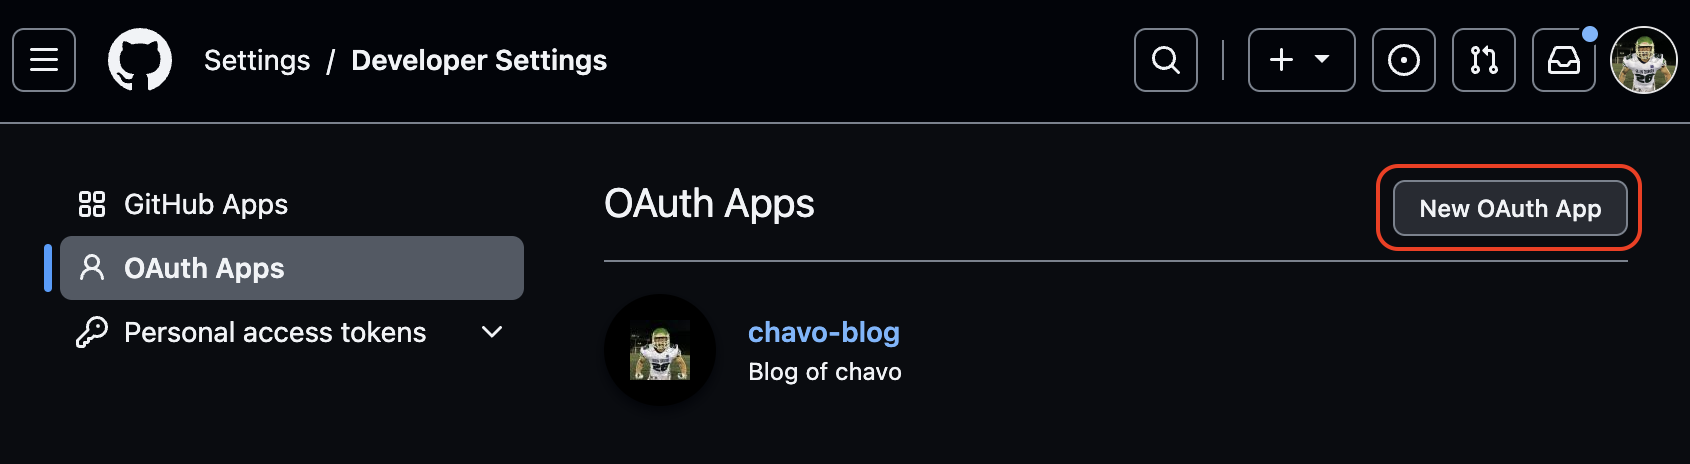
- 생성된 Github OAuth App에서
Generate a new client secret를 클릭해Client Secret을 생성합니다. Client ID와 생성된Client Secret를 기록합니다.- Github 로그인을 위한 링크를 생성합니다.
ex. https://github.com/login/oauth/authorize?client_id=<CLIENT_ID>&redirect_uri=<REDIRECT_URI>&scope=user
- 해당 링크를 클릭하여 로그인에 성공하면
Redirect URI로code를 받습니다.
ex. https://<REDIRECT_URI>?code=<CODE>
다음과 같이 Query Parameter로 code를 받습니다.
code를 백엔드 서버로 전송합니다.
Client Secret을 함께 전송해야 하기 때문에 브라우저에서 직접 전송할 경우 해당 정보가 노출될 수 있습니다.
- 백엔드 서버에서
code를Client Secret과 함께 Github에 전송합니다.
curl -X POST \
    https://github.com/login/oauth/access_token \
    -H 'Accept: application/json' \
    -d '{
        "client_id": "<CLIENT_ID>",
        "client_secret": "<CLIENT_SECRET>",
        "code": "<CODE>",
        "redirect_uri": "<REDIRECT_URI>"
    }'
- 응답으로 받은
access token을 이용하여 사용자 정보를 받습니다.
curl -X GET \
    https://api.github.com/user \
    - H 'Authorization: Bearer <ACCESS_TOKEN>'
    - H 'Accept: application/json'
다음과 같은 과정으로 Github 로그인을 구현할 수 있습니다.
세부적인 구현 내용을 기록합니다. 아래 내용은 실제 NextJS 프로젝트의 문법과 코드를 기반으로 작성되었지만,
코드를 단순화하기 위해 일부 코드는 생략되었습니다.
이에 대해 세부 내용이 궁금하시다면 댓글로 남겨주시면 감사하겠습니다. 😊

댓글을 쓰게 만드는 방법...
comments 정보를 API로부터 가져오는 CommentsContainer 컴포넌트를 구현합니다.
interface CommentsContainerProps {
  slug: string;
}

export const CommentsContainer: React.FC = ({slug}: CommentsContainerProps) => {
  const { data: comments } = useQuery<Comment[]> (
    "comments",
    async () => {
      const response = await fetch(`/api/comments/${slug}/`);
      const data = await response.json();
      return data;
    }
  );

  if (!comments) return <div>loading...</div>;

  return (
      <div>
        <CommentInput
            slug={slug}
        />
        <CommentList comments={comments} />
      </div>
  );
};
CommentsContainer 컴포넌트는 slug를 인자로 받아 해당 slug에 해당하는 댓글을 가져옵니다.
slug는 블로그 글의 고유 주소를 의미합니다.
예를 들어, 현재 글의 경우에는 https://blog.chavo.dev/blog/how-to-create-comments의 경우
how-to-create-comments가 slug입니다.
다음은 comments를 보여주는 CommentList 컴포넌트를 구현합니다.
import { CommentItem } from "./CommentItem";

interface CommentListProps {
  comments: Comment[];
}

export const CommentList: React.FC<CommentListProps> = ({ comments }) => {
  return (
    <div>
      {comments.length > 0 ? (comments.map((comment) => (
        <CommentItem key={comment.id} comment={comment} />
      ))) : (
        <div>댓글이 없습니다.</div>
      )}
    </div>
  );
};
comments가 존재하지 않는 경우를 빼먹지 않도록 주의합니다. :)
CommentItem 컴포넌트는 CommentList 컴포넌트의 자식으로 사용됩니다.
CommentItem 컴포넌트는 댓글을 보여주는 역할을 합니다.
import { CommentList } from "./CommentList";
import { CommentInput } from "./CommentInput";

interface CommentItemProps {
  comment: Comment;
}

export const CommentItem: React.FC<CommentItemProps> = ({ comment }) => {
  const [isReply, setIsReply] = useState(false);

  const onClickReply = () => {
    setIsReply(true);
  };

  return (
    <div>
      <div>
        <div>{comment.name}</div>
        <div>{comment.content}</div>
        <div>{comment.createdAt}</div>
        <button onClick={onClickReply}>답글</button>
      </div>
      <CommentList comments={comment.replies} />
      {isReply && (
        <div>
          <CommentInput
            slug={slug}
            parentId={comment.id}
          />
        </div>
      )}
    </div>
  );
};
CommentItem 컴포넌트는 댓글의 답글을 보여주기 위해 CommentList 컴포넌트를 자식으로 사용합니다.
또한, 댓글의 답글을 작성하기 위해 CommentInput 컴포넌트를 자식으로 사용합니다.
답글 달기를 클릭하지 않으면 CommentInput 컴포넌트는 보일 필요가 없기 때문에 isReply 상태를 사용하여
CommentInput 컴포넌트를 조건부 렌더링합니다.
Comment를 삭제하는 버튼을 추가하는 것은 간단합니다. CommentItem 컴포넌트에 onClickDelete 함수를 추가하고
해당 함수를 onClick 이벤트에 등록하면 됩니다. CommentItem 컴포넌트의 Comment 객체에 id가 존재하기 때문에
onClickDelete 함수에서 해당 id를 사용하여 API로부터 댓글을 삭제할 수 있습니다.
익명 댓글 삭제의 경우 삭제 버튼 클릭 시 비밀번호를 입력받는 모달을 띄우고 비밀번호를 입력받은 후에 비밀번호가 일치하면
댓글을 삭제할 수 있도록 구현할 수 있습니다.
해당 모달 구현은 필요에 따라 구현하시면 됩니다. :)
(현재 블로그의 경우에는 삭제 버튼을 누르면 댓글에 오버레이를 띄워서 비밀번호를 입력받는 input을 띄우도록 구현되어 있습니다.)
CommentInput 컴포넌트는 댓글을 작성하는 컴포넌트입니다.
import {GithubIcon} from "app/common/icons/GithubIcon";
interface CommentInputProps {
  slug: string;
  parentId?: string;
}

interface GithubUser {
  username: string;
  id: string;
}

export const CommentInput: React.FC<CommentInputProps> = ({ slug, parentId }) => {
  const [name, setName] = useState("");
  const [password, setPassword] = useState("");
  const [content, setContent] = useState("");
  const [githubUser, setGithubUser] = useState<GithubUser | null>(null);

  const onChangeName = (e: React.ChangeEvent<HTMLInputElement>) => {
    setName(e.target.value);
  };

  const onChangeContent = (e: React.ChangeEvent<HTMLTextAreaElement>) => {
    setContent(e.target.value);
  };

  const onChangePassword = (e: React.ChangeEvent<HTMLInputElement>) => {
    setPassword(e.target.value);
  };

  const onSubmit = async (e: React.FormEvent<HTMLFormElement>) => {
    e.preventDefault();

    const response = await fetch(`/api/comments/${slug}/`, {
      method: "POST",
      headers: {
        "Content-Type": "application/json",
      },
      body: JSON.stringify({
        name: githubUser ? githubUser.username : name,
        password: githubUser ? githubUser.id : password,
        content,
        parentId,
      }),
    });

    if (response.ok) {
      setName("");
      setContent("");
    }
  };

  return (
    <form onSubmit={onSubmit}>
        {
        githubUsername ? (
            <div>
                <GithubIcon />
                <input
                    type="text"
                    value={githubUsername}
                    onChange={(e) => setGithubUsername(e.target.value)}
                />
            </div>
        ) : (
            <div>
                <input
                    type="text"
                    value={name}
                    onChange={onChangeName}
                />
                <input
                    type="password"
                    value={password}
                    onChange={onChangePassword}
                />
            </div>
        )
        }
        <textarea
        value={content}
        onChange={onChangeContent}
        />
        <button type="submit">댓글 작성</button>
        <GithubLoginButton
            githubUser={githubUser}
            setGithubUser={setGithubUser}
        />
    </form>
  );
};
다소 복잡해 보이지만, 각 input에 대한 onChange 함수와 onSubmit 함수만 보면 됩니다.
이름, 비밀번호, 댓글 내용을 입력받으면 onChange 함수가 실행되어 해당 값을 상태에 저장합니다.
댓글 작성 버튼을 클릭하면 해당 내용을 전송하는 onSubmit 함수가 실행됩니다.
githubUser가 있는 경우에는 username과 id를 사용하여 댓글을 작성할 수 있도록 구현하였습니다.
githubUser가 있는 경우 password에 id를 사용하는 것은 github 유저 정보에서 변하지 않는 값이기 때문에 password를
대체하여 사용하였습니다.
GithubLoginButton 컴포넌트는 깃허브 아이디를 사용하여 댓글을 작성할 수 있도록 해주는 컴포넌트입니다.
import {useEffect} from "react";
import {useSearchParams} from "next/navigation";

interface GithubLoginButtonProps {
  githubUsername: GithubUser | null;
  setGithubUsername: React.Dispatch<React.SetStateAction<GithubUser | null>>;
}

export const GithubLoginButton: React.FC<GithubLoginButtonProps> = ({ githubUser, setGithubUser }) => {
    const searchParams = useSearchParams()
    const code = searchParams.get("code")

    useEffect(() => {
        if(!code) return

        fetch(
            `/api/github/`,
        {
                method: "POST",
                body: JSON.stringify({
                    code,
                    redirectUri: window.location.href,
                }),
            },
        ).then(async (res) => {
            const data = await res.json()

            setGithubUser(data)
            alert("로그인에 성공했습니다.")
        })
        .catch(() => {
            alert("로그인에 실패했습니다.")
        })
    }, [code])

    const onClick = async () => {
        location.href = `https://github.com/login/oauth/authorize`+
            `?client_id=${process.env.NEXT_PUBLIC_GITHUB_CLIENT_ID}`+
            `&redirect_uri=${window.location.origin + window.location.pathname}`+
            `?provider=github`
    };

    const onClickLogout = async () => {
        const response = await fetch("/api/auth/logout");
        if (response.ok) {
            setGithubUser(null);
        }
    };

    return (
    <div>
      {githubUser ? (
        <button onClick={onClickLogout}>로그아웃</button>
      ) : (
        <button onClick={onClick}>깃허브 로그인</button>
      )}
    </div>
    );
};
깃허브 로그인 버튼을 클릭하면 onClick 함수가 실행됩니다.
onClick 함수는 깃허브 로그인 페이지로 이동합니다.
로그인에 성공하면 code라는 파라미터가 주소에 추가되어 리다이렉되는데,
useEffect 함수가 실행되어 code를 서버로 전송합니다.
사용자 정보를 받아오는 로직을 백엔드에서 처리하여 사용자 정보를 받아오면
githubUser 상태를 업데이트합니다.
githubUser 상태가 업데이트되면 로그아웃 버튼이 보이도록 합니다.
로그아웃 버튼을 클릭하면 onClickLogout 함수가 실행되어 githubUser 상태를 null로 업데이트합니다.
다음과 같이 GithubLoginButton 컴포넌트를 구현하면
답글 쓸 때 깃헙 로그인을 할 때 댓글을 쓰는 컴포넌트에서는 Github 로그인이 처리되지 않습니다.
이는 githubUser 상태를 전역으로 관리하지 않았기 때문입니다.
이 부분을 해결하고 싶다면 전역 상태 관리를 위한 Redux나 Zustand 같은 라이브러리를 사용하면 됩니다. :)
댓글을 저장할 데이터베이스는 MongoDB를 사용하였습니다. MongoDB는 NoSQL 데이터베이스로, 데이터를 JSON 형태로 저장합니다. 사이드 프로젝트의 경우 스키마가 자주 변경되는데, 이를 NoSQL 데이터베이스로 저장하면 스키마 변경에 따른 데이터베이스 변경이 필요 없습니다.
백엔드 서버는 NextJS의 Route Handlers를 사용하여 구현하였습니다. 별도의 프레임워크를 사용하지 않아도 되어서 간단하게 구현할 수 있었습니다.
댓글 작성은 POST /api/comments/:slug/로 구현하였습니다.
import {Comment} from "app/common/modules/comment";
import {ObjectId} from "mongodb";
import {NextResponse} from "next/server";
import bcrypt from 'bcrypt';

const saltRounds = 10;

export async function POST(req: Request, { params }: { params: { slug: string }}) {
    try {
        const client = await clientPromise;
        const db = client.db("blog");
        const coll = db.collection<Comment>("comments");

        const slug = params.slug as string;

        const { name, password, ...body } =  await req.json();

        const hash = await bcrypt.hash(password, saltRounds);

        const comment = {
            ...body,
            name,
            password: hash,
            slug,
            createdAt: new Date().toISOString(),
        } as Comment;

        comment.parentId = comment.parentId && new ObjectId(comment.parentId);
        const inserted = await coll
            .insertOne(comment);
        const {password: _, ...rest} = comment;
        rest._id = inserted.insertedId;

        return NextResponse.json(rest, {
            status: 201,
        })
    } catch (e) {
        console.error(e);
    }
}
일반적인 bcrypt를 사용하여 비밀번호를 암호화하였습니다.
bcrypt는 해시 함수로, 입력받은 문자열을 암호화하여 저장합니다.
익명 댓글을 작성할 수 있도록 비밀번호를 입력받아야 하는데, 비밀번호를 암호화하여 저장하면
데이터베이스에 저장된 비밀번호를 알 수 없습니다.
익명 댓글을 구현할 경우 꼭 암호화하여 패스워드를 저장하세요.
댓글 조회는 GET /api/comments/:slug/로 구현하였습니다.
...(skip)

export async function GET(req: Request, { params }: { params: { slug: string }}) {
    try {
        const client = await clientPromise;
        const db = client.db("blog");
        const coll = db.collection<Comment>("comments");

        const slug = params.slug as string;

        const comments = await coll
            .find({slug}, {
                projection: {
                    password: 0,
                }
            })
            .sort({createdAt: 1})
            .toArray();

        const childComments = comments.reduce((acc, comment) => {
            if (comment.parentId) {
                return ({
                    ...acc,
                    [comment.parentId.toString()]: acc[comment.parentId.toString()] ? [...acc[comment.parentId.toString()], comment] : [comment,],
                })
            }
            return acc;
        }, {} as Record<string, WithId<Comment>[]>);

        const commentsWithChildren = comments.map(comment => ({
            ...comment,
            replies: childComments[comment._id.toString()] || [],
        }));

        return NextResponse.json(commentsWithChildren);
    } catch (e) {
        console.error(e);
    }
}
댓글을 조회할 때는 password 필드를 제외하고 조회합니다. mongodb의 projection을 사용하여
password 필드를 제외하였습니다.
또한 reply를 구현하기 위해 댓글을 조회할 때 댓글의 parentId를 기준으로 댓글을 그룹화하였습니다.
많은 댓글이 달려있지 않을 때는 위처럼 댓글을 그룹화하지 않고 조회하는 것이 더 효율적일 수 있습니다.
하지만 댓글이 많아지면 답글을 따로 조회하는 것이 더 효율적입니다.
깃헙 유저 정보를 가져오는 API는 POST /api/github로 구현하였습니다.
async function getUser(accessToken: string) {
    const resp2 = await fetch(
        `https://api.github.com/user`,
        {
            method: 'GET',
            headers: {
                'Content-Type': 'application/vnd.github+json',
                'Authorization': `Bearer ${accessToken}`,
            }
        }
    )

    const { login, avatar_url: avatarUrl, node_id: nodeId } = await resp2.json();

    return {
        username: login,
        id: nodeId,
    }
}

export async function POST(req: Request) {
    try {
        const { code, redirectUri } = await req.json() as {
            code: string;
            redirectUri: string;
        };

        const resp = await fetch(
            `https://github.com/login/oauth/access_token?` + new URLSearchParams({
                client_id: process.env.NEXT_PUBLIC_GITHUB_CLIENT_ID!,
                client_secret: process.env.GITHUB_CLIENT_SECRET!,
                code,
                redirect_uri: redirectUri,
            }),
            {
                method: 'POST',
                headers: {
                    'Accept': 'application/json',
                },
            }
        )

        const body = await resp.json();
        const accessToken = body.access_token;

        const userData = await getUser(accessToken);

        return NextResponse.json({
            ...userData,
            accessToken,
        }, {
            status: 201,
        })
    } catch (e) {
        console.error(e);
        return NextResponse.json(
            {message: (e as Error).message},
            {status: 500}
        )
    }
}
다음과 같이 code와 redirectUri를 받아서 깃헙 API를 호출하여 유저 정보를 가져옵니다.
code는 깃헙 로그인을 할 때 깃헙에서 발급하는 코드이고, redirectUri는 깃헙 로그인을 할 때
리다이렉트할 주소입니다. redirectUri는 깃헙 로그인을 할 때 설정한 리다이렉트 주소와 같아야 합니다.
Github 유저 정보를 받아올 때 login은 유저의 아이디이고, node_id는 유저의 고유 아이디입니다.
login은 유저가 변경할 수 있지만, node_id는 변경할 수 없습니다.
따라서 node_id를 유저의 고유 아이디로 사용합니다.
이번 글에서는 블로그에서 Github 유저 정보나 익명으로 댓글을 쓸 수 있는 기능을 구현하는 방법을 알아보았습니다. 간단하게 적을 수 있을 것이라 생각했는데 생각보다 글이 길어졌습니다. 😅 그러다보니 실제 구현 부분의 코드를 간략하게만 적어놓았습니다. 실제로 구현하기를 원하는 분들은 구조 부분을 참조하여 본인 코드베이스에 맞게 구현하시면 될 것 같습니다. :)
읽어주셔서 감사합니다!